Setting up multiplayer
Instructions can be found below on how to connect online to other players through PPSSPP. Instructions on how to connect online on PSP and PS Vita will not be provided due to issues with cross play, and most of the community plays on PPSSPP.
Internet-Multi Mode is now defunct, as the online servers for the game were taken offline by SEGA on 2015-09-29. However, it is still possible to play online through peer-to-peer connectivity, through adhoc servers or gaming VPNs. This means that multiplayer games must be arranged in advance, for example through the PSP2i Community Discord.
Before playing multiplayer, it is highly recommended to clear both episodes of Story Mode, as without clearing the story, you will not have access to missions or adequate shop items.
Solo multi mode[edit | edit source]
If playing multi mode alone, no extra setup is required, and can be done without connecting to any outside sources. The below is also applicable if playing multi mode on PPSSPP on the same system, or physically with multiple PSPs or PS Vitas, although someone will have to form party and then join it.
If playing on hardware, make sure that the WLAN switch or internet connectivity is turned on. You will be able to tell if this is the case in the main menu at the bottom, as there is a small banner that signifies the current status of the WLAN switch.
![]()
- In PPSSPP, choose Settings on the home screen → Networking.
- Change your settings on the page to the following:
- Enable networking/WLAN: On
- Enable built-in PRO ad hoc server: On
- Change PRO ad hoc server IP address: localhost
You are now all set up to play multi mode alone!
- In-game, go to Multi Mode, choose Form Party, then Begin Party Play, and multi mode will start.
PPSSPP multiplayer on the same network[edit | edit source]
If playing multi mode together on the same network, no extra setup is required, and can be done without connecting to any outside sources.
- On the machine that will be hosting, find out its local IP address.
- Windows PC: Open cmd.exe and type ipconfig. This will bring up some information, the IPv4 address that starts 192.168 or 10.0 will be the local IP address. For example: 192.168.1.15
- Android: This may differ from device to device, but the usual way to find this out is to go to Settings → About device → Status. On this screen, the IP listed under local IP address is the device's local IP address.
- Steam Deck: In desktop mode, click on the system tray network icon in the bottom right corner of the screen. Then, click on the active connection, click on details, and the address under IPv4 Address is your local IP address.
- In PPSSPP on all systems, choose Settings on the home screen → Networking.
- Change your settings on the page to the following:
- Enable networking/WLAN: On
- Enable built-in PRO ad hoc server: On
You are now fully setup to play multiplayer with other players! When going to play with other players, follow the below steps:
- Decide who will host the game.
- In PPSSPP networking settings, all players must set Change PRO ad hoc server IP address to the local IP address of the host.
- Restart PPSSPP to make sure the settings change.
- In-game, go to Multi Mode and form/join party as necessary, and you should all be good to go!
PPSSPP multiplayer over the internet[edit | edit source]
Note: We use ZeroTier One for multiplayer over the internet due to simplicity and ease. However, every so often the network requires a reset - if you find you are unable to connect one day, please return here and rejoin on the new network ID.
What you need:
- Zero Tier One (Windows 7 and Windows 8 cannot use the latest version, and must use version 1.6.6)
- Install Zero Tier One on your system.
- The program will be in the system tray in the bottom right; click it and click Join New Network....
- In the window that comes up, paste the string 48d6023c46153e42 and then click Join. (If a prompt appears asking if you wish for your PC to discoverable, it is advised to click No)
Now that you are connected to the PSP2i network, you will need to do a one-time setup in PPSSPP:
- In PPSSPP, click Game settings → More settings → Networking.
- Change your settings on the page to the following:
- Enable networking/WLAN: On
- Change PRO ad hoc server IP address: 172.23.1.1
- Port offset: 10000 (this is default)
With this done, make sure to restart the emulator.
You are now fully setup to play multiplayer with other players! When going to play with other players, follow the below steps:
- Make sure that you are connected to ZeroTier One.
- In-game, go to Multi Mode and form/join party as necessary, and you should all be good to go!
What you need:
- Install the ZeroTierOne.apk on your system.
- Open the app and tap the + icon in the top right.
- In the screen that comes up, enter the string 48d6023c46153e42 under Network ID and tap Add Network.
- Connect to the network and you should see PSP2i appear. If you do not, accept any messages, disconnect and then reconnect, and it should appear.
Now that you are connected to the PSP2i network, you will need to do some setup in PPSSPP:
- In PPSSPP, tap Settings on the home screen → Networking.
- Change your settings on the page to the following:
- Enable networking/WLAN: On
- Change PRO ad hoc server IP address: 172.23.1.1
- Port offset: 10000 (this is default)
With this done, make sure to restart the emulator.
You are now fully setup to play multiplayer with other players! When going to play with other players, follow the below steps:
- Make sure that you are connected to ZeroTier One - this is signified by the network being turned on in the app and a key icon at the top of your phone's screen.
- In-game, go to Multi Mode and form/join party as necessary, and you should all be good to go!
- Because of how SteamOS handles updates, it is possible that ZeroTier One will require a re-installation after one. If this occurs, only step 3 of the installation guide needs to done again unless the script file is deleted.
What you need:
- PSP2i.sh - A bash script file that will install ZeroTier One and connect you to the PSP2i server in one click.
- If you have never done it before, open the Konsole application and type
passwdto set a sudo password. Note that inputs are not shown when typing in password fields in Konsole. - Right-click the PSP2i.sh file, click properties, click permissions, and make sure the Is executable box is ticked.
- Right-click the PSP2i.sh file and click Run in Konsole, input your sudo password and accept any prompts.
If 200 join OK is displayed at the end, everything was successful. If an error message is received regarding ports, run the script again and it will work.
Now that you are connected to the PSP2i network, you will need to do some setup in PPSSPP:
- In PPSSPP on the home screen, click on Settings, then Networking.
- Change your settings on the page to the following:
- Enable networking/WLAN: On
- Change PRO ad hoc server IP address: 172.23.1.1
- Port offset: 10000 (this is default)
With this done, make sure to restart the emulator.
You are now fully setup to play multiplayer with other players! When going to play with other players, follow the below steps:
- Make sure that you are connected to ZeroTier One. You can double check this seeing if your 172.23 address is displayed in PPSSPP under the IP address list. If you are not, re-run the PSP2i.sh script.
- In-game, go to Multi Mode and form/join party as necessary, and you should all be good to go!
Extra: When you connect to our PSP2i adhoc server, you will display on the wiki's front page. If you wish to change your display name, go into Settings and System and go to Change nickname.
If you ever wish to disable the ZeroTier One service, use the below commands in Konsole:
sudo systemctl stop zerotier-one.service- This will stop the service.sudo systemctl disable zerotier-one.service- This will stop the service booting up on system launch.
If you ever wish to uninstall ZeroTier One, use the below command in Konsole:
sudo pacman -Rcns zerotier-one
Network tips[edit | edit source]
Leave the ZeroTier network when not playing
On Windows and Android, to make the experience better for people and to avoid network strain, it is advised to always leave the network temporarily while you are not playing. This can be done easily from the ZeroTier menu for joining - simply go to the network and leave it - you will always be able to rejoin at any time.
Low bandwidth mode
It is also advisable to turn on low bandwidth mode. To do this, download this configuration file and place it in the following location:
Windows: C:\ProgramData\ZeroTier\One
Linux: /var/lib/zerotier-one
Linux will require sudo, to do this, open the terminal where you downloaded the .conf file to, then input the following: sudo mv local.conf /var/lib/zerotier-one
This has no effect on using the network and will reduce latency for yourself and others.
Troubleshooting[edit | edit source]
A network error has occurred after infinite walk[edit | edit source]
Windows PC: Download PPSSPP 1.10.3 and try again. There is an issue for some players where versions beyond this do not work properly online.
Allow ZeroTier One through your firewall (Windows PC)[edit | edit source]
ZeroTier One will setup inbound and outbound rules for your firewall to allow the necessary ports and applications through, but it is possible your firewall may still be blocking this. You will need to setup some inbound and outbound rules to make sure the IP range of the PSP2i network is being allowed through.
- Open the Windows Settings app.
- Type in firewall in the search bar, and open Windows Defender Firewall.
- In the left column, click advanced settings, and a new window should come up with a column that says Inbound Rules and Outbound Rules.
- Click Inbound Rules, and click New Rule... on the right hand side.
- In the next window that pops up, follow the following instructions, using the steps column on the left:
- Set Rule Type to Custom.
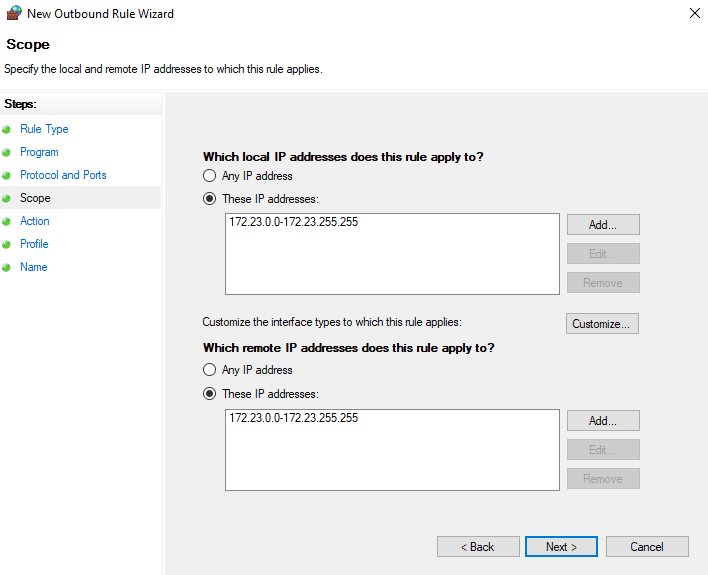
- Click Scope, then tick the two options for These IP addresses.
- Click Add next to both boxes, and then This IP address range, and enter 172.23.0.0 in the top box, and 172.23.255.255 in the bottom box. See example image below of the finished result.
- Click Action and make sure allow the connection is ticked.
- Click Name and choose any name for this rule.
- Repeat the above instructions for an Outbound Rule.