Instructions can be found below on how to connect online to other players through PPSSPP. Instructions on how to connect online on PSP and PS Vita will not be provided due to issues with cross play, and most of the community plays on PPSSPP.
Internet-Multi Mode is now defunct, as the online servers for the game were taken offline by SEGA on 2015-09-29. However, it is still possible to play online through peer-to-peer connectivity, through adhoc servers or gaming VPNs. This means that multiplayer games must be arranged in advance, for example through the PSP2i Community Discord.
Before playing multiplayer, it is highly recommended to clear both episodes of Story Mode, as without clearing the story, you will not have access to missions or adequate shop items.
If having any issues, it is recommended to try using PPSSPP version 1.10.3 first. Download links to this version may be found on the installation page. If more assistance is required, please ask at the PSP2i Community Discord for help.
Solo multi mode
If playing multi mode alone, no extra setup is required, and can be done without connecting to any outside sources. The below is also applicable if playing multi mode on PPSSPP on the same system, or physically with multiple PSPs or PS Vitas, although someone will have to form party and then join it.
ExpandPSP / PS Vita
If playing on hardware, make sure that the WLAN switch or internet connectivity is turned on. You will be able to tell if this is the case in the main menu at the bottom, as there is a small banner that signifies the current status of the WLAN switch.

With this active, go to
Multi Mode, choose
Form Party, then
Begin Party Play, and multi mode will start.
ExpandPPSSPP
- In PPSSPP, choose Settings on the home screen → Networking.
- Change your settings on the page to the following:
- Enable networking/WLAN: On
- Change MAC Address: Make sure to tap this at least once to get a random MAC Address. This only has to be done if it has never been done before.
- Enable built-in PRO ad hoc server: On
- Change PRO ad hoc server IP address: localhost
You are now all set up to play multi mode alone!
- In-game, go to Multi Mode, choose Form Party, then Begin Party Play, and multi mode will start.
PPSSPP multiplayer on the same network
If playing multi mode together on the same network, no extra setup is required, and can be done without connecting to any outside sources.
ExpandAll platforms
- On the machine that will be hosting, find out its local IP address.
- Windows PC: Open cmd.exe and type ipconfig. This will bring up some information, the IPv4 address that starts 192.168 or 10.0 will be the local IP address. For example: 192.168.1.15
- Android: This may differ from device to device, but the usual way to find this out is to go to Settings → About device → Status. On this screen, the IP listed under local IP address is the device's local IP address.
- Steam Deck: In desktop mode, click on the system tray network icon in the bottom right corner of the screen. Then, click on the active connection, click on details, and the address under IPv4 Address is your local IP address.
- In PPSSPP on all systems, choose Settings on the home screen → Networking.
- Change your settings on the page to the following:
- Enable networking/WLAN: On
- Change MAC Address: Make sure to tap this at least once to get a random MAC Address. This only has to be done if it has never been done before.
- Enable built-in PRO ad hoc server: On
You are now fully setup to play multiplayer with other players! When going to play with other players, follow the below steps:
- Decide who will host the game.
- In PPSSPP networking settings, all players must set Change PRO ad hoc server IP address to the local IP address of the host.
- Make sure that all players are using the same port offset as well; 1100 is recommended for compatibility with mobile devices.
- Restart PPSSPP to make sure the settings change.
- In-game, go to Multi Mode and form/join party as necessary, and you should all be good to go!
PPSSPP multiplayer over the internet
ZeroTier One (Recommended)
- Pros: Easy installation, very quick to setup.
- Cons: Doesn't work for everybody.
ExpandWindows PC
What you need:
- Zero Tier One (Windows 7) - Zero Tier One is a virtual network management program, similar to Hamachi. It allows people to join a network and connect to each other seamlessly without requiring router setups, port forwarding, or other such configurations. We recommend this program currently as it is free and has crossplay with mobile devices running PPSSPP.
- Install Zero Tier One on your system.
- The program will be in the system tray in the bottom right; click it and click Join New Network....
- In the window that comes up, paste the string b6079f73c6cd58c5 and then click Join.
- Click the program in the system tray again and you should now see the PSP2i network, with an extra menu, including Managed Addresses. This managed address is your ZeroTier One IP, click it to copy it to your clipboard.
Now that you are connected to the PSP2i network, you will need to do some setup in PPSSPP:
- In PPSSPP, click Game settings → More settings → Networking.
- Change your settings on the page to the following:
- Enable networking/WLAN: On
- Change MAC Address: Make sure to click this at least once to get a random MAC Address. This only has to be done if it has never been done before.
- Enable built-in PRO ad hoc server: On
- Port offset: 1100
You are now fully setup to play multiplayer with other players! When going to play with other players, follow the below steps:
- Make sure that you are connected to ZeroTier One.
- Decide who will host the game.
- In PPSSPP networking settings, all players must set Change PRO ad hoc server IP address to the Zero Tier Managed Address of the host (without the /16). You can find this IP address under managed addresses in the PSP2i network.
- Make sure that all players are using the same port offset as well; 1100 is recommended for compatibility with mobile devices.
- Restart PPSSPP to make sure the settings change.
- In-game, go to Multi Mode and form/join party as necessary, and you should all be good to go!
ExpandAndroid
What you need:
- Zero Tier One - Zero Tier One is a virtual network management program, similar to Hamachi. It allows people to join a network and connect to each other seamlessly without requiring router setups, port forwarding, or other such configurations. We recommend this program currently as it is free and has crossplay with mobile devices running PPSSPP.
- Install the ZeroTierOne.apk on your system.
- Open the app and tap the + icon in the top right.
- In the screen that comes up, enter the string b6079f73c6cd58c5 under Network ID and tap Add Network.
- You should now see the PSP2i network come up -- tap it and you will see a lot of extra information, including Managed IPs.
Now that you are connected to the PSP2i network, you will need to do some setup in PPSSPP:
- In PPSSPP, tap Settings on the home screen → Networking.
- Change your settings on the page to the following:
- Enable networking/WLAN: On
- Change MAC Address: Make sure to tap this at least once to get a random MAC Address. This only has to be done if it has never been done before.
- Enable built-in PRO ad hoc server: On
- Port offset: 1100
You are now fully setup to play multiplayer with other players! When going to play with other players, follow the below steps:
- Make sure that you are connected to ZeroTier One - this is signified by the network being turned on in the app and a key icon at the top of your phone's screen.
- Decide who will host the game.
- In PPSSPP networking settings, all players must set Change PRO ad hoc server IP address to the Zero Tier Managed IP of the host (without the /16).
- Make sure that all players are using the same port offset as well; 1100 is recommended for compatibility with mobile devices.
- Restart PPSSPP to make sure the settings change.
- In-game, go to Multi Mode and form/join party as necessary, and you should all be good to go!
ExpandSteam Deck
Please note that installation of ZeroTier One on the Steam Deck will require usage of the terminal. If you follow these instructions exactly, you should have no issues.
- 1. Open the terminal, by opening the Application Launcher, then System, then Konsole. Alternatively, you can open the terminal by pressing Ctrl+Alt+T.
- 2. First, a password needs to be created for heightened permissions. Do this by entering the below command and following the instructions.
passwd
- 3. The SteamOS needs to be made writable for programs to install, so enter the command below. Enter your password, and it will be done silently; if successful no error messages will be sent back.
sudo steamos-readonly disable
- 4. Next, the pacman manager needs to be installed to allow easy installation of ZeroTier One. Enter the two commands below, one after the other.
sudo pacman-key --init
sudo pacman-key --populate archlinux
- 5. If done successfully, you will get a message stating appending keys from archlinux.gpg. Allow the process to finish.
- 6. After the above finishes, type the below command and confirm the installation. This will install ZeroTier One.
sudo pacman -S zerotier-one
- 7. After installing ZeroTier One, type the two below commands, one after the other, to boot ZeroTier One, and have it start on bootup.
sudo systemctl enable zerotier-one.service
sudo systemctl start zerotier-one.service
- 8. To double check you're connected to ZeroTier One, type the below command. If successful, you will receive a message back similar to 200 info [ID] [version] ONLINE.
sudo zerotier-cli info
- 9. Type the below to connect to the PSP2i ZeroTier One network. If successful, you will get a message saying 200 join OK.
sudo zerotier-cli join b6079f73c6cd58c5
- 10. For security, it is recommended that you make SteamOS read-only again by typing the below command. This is not strictly necessary, however.
sudo steamos-readonly enable
Now that you are connected to the PSP2i network, you will need to do some setup in PPSSPP:
- In PPSSPP on the home screen, click on Settings, then Networking.
- Change your settings on the page to the following:
- Enable networking/WLAN: On
- Change MAC Address: Make sure to click this at least once to get a random MAC Address. This only has to be done if it has never been done before.
- Enable built-in PRO ad hoc server: On
- Port offset: 1100
You will need to make a note of your ZeroTier One address - you should be able to find this by clicking on Change PRO ad hoc server IP address, then toggle list, then scroll down until you see an IP address that begins 172.23. If you are unable to find your ZeroTier One address in this manner, open up the terminal again and type sudo zerotier-cli listnetworks; your managed IP address will be shown at the end of the resulting message.
You are now fully setup to play multiplayer with other players! When going to play with other players, follow the below steps:
- Make sure that you are connected to ZeroTier One. You can double check this by typing
sudo zerotier-cli info in the console if needed.
- Decide who will host the game.
- In PPSSPP networking settings, all players must set Change PRO ad hoc server IP address to the Zero Tier Managed IP of the host (without the /16).
- Make sure that all players are using the same port offset as well; 1100 is recommended for compatibility with mobile devices.
- Restart PPSSPP to make sure the settings change.
- In-game, go to Multi Mode and form/join party as necessary, and you should all be good to go!
If you ever wish to disable the ZeroTier One service, use the below commands:
sudo systemctl stop zerotier-one.service - This will stop the service.sudo systemctl disable zerotier-one.service - This will stop the service booting up on system launch.
socom.cc
- Pros: Requires no installations, extremely quick setup.
- Cons: Requires WiFi/Ethernet connection, does not work over mobile connections, and router must have UPnP enabled or DMZ. Can be spotty for many players.
ExpandWindows PC / Steam Deck
- In PPSSPP, click Game settings → More settings → Networking.
- Set Change PRO ad hoc server IP address to socom.cc.
- Tick Enable UPnP (need a few seconds to detect).
- Untick Forced first connect (faster connect).
You are now fully setup to play multiplayer with other players! When going to play with other players, follow the below steps:
- Make sure that all players are using the same port offset in networking settings; 1100 is recommended for compatibility with mobile devices.
- In-game, go to Multi Mode and form/join party as necessary, and you should all be good to go!
ExpandAndroid
- In PPSSPP, tap Settings on the home screen → Networking.
- Set Change PRO ad hoc server IP address to socom.cc.
- Tick Enable UPnP (need a few seconds to detect).
- Untick Forced first connect (faster connect).
You are now fully setup to play multiplayer with other players! When going to play with other players, follow the below steps:
- Make sure that all players are using the same port offset in networking settings; 1100 is recommended for compatibility with mobile devices.
- In-game, go to Multi Mode and form/join party as necessary, and you should all be good to go!
HunsterVerse
- Pros: Uses a static IP for the server, no need to change every game. Tends to have the most success.
- Cons: Lengthy setup, requires signing up with e-mail address, must join a Discord server and can have significant latency issues.
ExpandWindows PC
If you are already signed up for HunsterVerse for Monster Hunter Portable, your current setup can be used for PSP2i.
What you need:
- Sign up for HunsterVerse here. You should receive an e-mail with a 12 character code.
- Join the HunsterVerse Discord here.
- Go to the #welcome channel and follow the instructions shown to be able to see the rest of the Discord channels.
- Go to the #bot-command channel and type !activate CODE, where CODE is the 12 character code you received to your e-mail address. If successful, you should now receive an OpenVPN certificate file to your e-mail address.
- Install OpenVPN, and make sure to also install the network adapter when it asks.
- After installation, open the program OpenVPNGUI.
- In the system tray in the bottom right, there will be a monitor icon with a lock. Right-click this and click import file, then choose the certificate file you received earlier.
- A new icon should have appeared in the bottom right. Right click this and click connect to connect to HunsterVerse. The icon should turn green to signify a successful connection.
It may be necessary to allow PPSSPP and OpenVPN through your firewall if you run into any issues here.
Now that you are connected to HunsterVerse, you will need to do some setup in PPSSPP:
- In PPSSPP, click Game settings → More settings → System → Change nickname and change your nickname to your HunsterVerse username. This is required to connect.
- Click Game settings → More settings → Networking.
- Change your settings on the page to the following:
- Enable networking/WLAN: On
- Change MAC Address: Make sure to click this at least once to get a random MAC Address. This only has to be done if it has never been done before.
- Enable built-in PRO ad hoc server: Off
- Change PRO ad hoc server IP address: 10.42.0.1 (if this ever stops working, go to #bot-command on the HunsterVerse Discord and type !ip to get the new address)
You are now fully setup to play multiplayer with other players! When going to play with other players, follow the below steps:
- Make sure that all players are using the same port offset in networking settings; 1100 is recommended for compatibility with mobile devices.
- In-game, go to Multi Mode and form/join party as necessary, and you should all be good to go!
ExpandAndroid
If you are already signed up for HunsterVerse for Monster Hunter Portable, your current setup can be used for PSP2i.
What you need:
- Sign up for HunsterVerse here. You should receive an e-mail with a 12 character code.
- Join the HunsterVerse Discord here.
- Go to the #welcome channel and follow the instructions shown to be able to see the rest of the Discord channels.
- Go to the #bot-command channel and type !activate CODE, where CODE is the 12 character code you received to your e-mail address. If successful, you should now receive an OpenVPN certificate file to your e-mail address.
- Install OpenVPN.
- After installation, open the app OpenVPNGUI.
- Tap on the three dots, choose Import and choose Import profile from SD Card, browse for your certificate you received earlier, and tap Accept.
- Choose Connect.
Now that you are connected to HunsterVerse, you will need to do some setup in PPSSPP:
- In PPSSPP, tap Settings on the home screen → System → Change nickname and change your nickname to your HunsterVerse username. This is required to connect.
- Tap Settings on the home screen → Networking.
- Change your settings on the page to the following:
- Enable networking/WLAN: On
- Change MAC Address: Make sure to tap this at least once to get a random MAC Address. This only has to be done if it has never been done before.
- Enable built-in PRO ad hoc server: Off
- Change PRO ad hoc server IP address: 10.42.0.1 (if this ever stops working, go to #bot-command on the HunsterVerse Discord and type !ip to get the new address)
You are now fully setup to play multiplayer with other players! When going to play with other players, follow the below steps:
- Make sure that all players are using the same port offset in networking settings; 1100 is recommended for compatibility with mobile devices.
- In-game, go to Multi Mode and form/join party as necessary, and you should all be good to go!
Troubleshooting
- The below section will mostly deal with troubleshooting for ZeroTier One multiplayer over the internet. For solo multi mode and multiplayer over the same network, there are no scenarios in which connections will not work, so please re-follow the above steps. It is also recommended to make sure you have followed the instructions above fully before trying any of the below.
- If still having issues, please ask for assistance in the PSP2i Community Discord.
Windows PC
Check ZeroTier Network is set to private
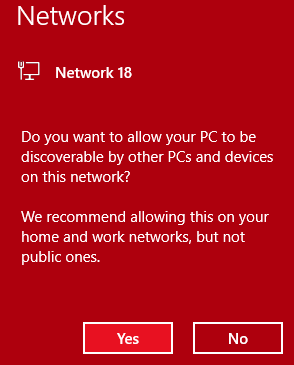
When first connecting to the PSP2i network for ZeroTier One, Windows should ask you if you want the network to be discoverable by other computers. Make sure to press yes, or people will not be able to connect to you.
If you are not sure if you've done this or not, you can re-initialise the network by:
- Opening ZeroTier One if it is not already open.
- Right-clicking the icon in the system tray, then opening the PSP2i network, and then clicking Disconnect.
- Right-click the icon in the system tray again, open the PSP2i network once more, and click Reconnect.
- Wait a short moment, and Windows should display the below; click Yes.
Allow ZeroTier One through your firewall
ZeroTier One will setup inbound and outbound rules for your firewall to allow the necessary ports and applications through, but it is possible your firewall may still be blocking this. You will need to setup some inbound and outbound rules to make sure the IP range of the PSP2i network is being allowed through.
- Open the Windows Settings app.
- Type in firewall in the search bar, and open Windows Defender Firewall.
- In the left column, click advanced settings, and a new window should come up with a column that says Inbound Rules and Outbound Rules.
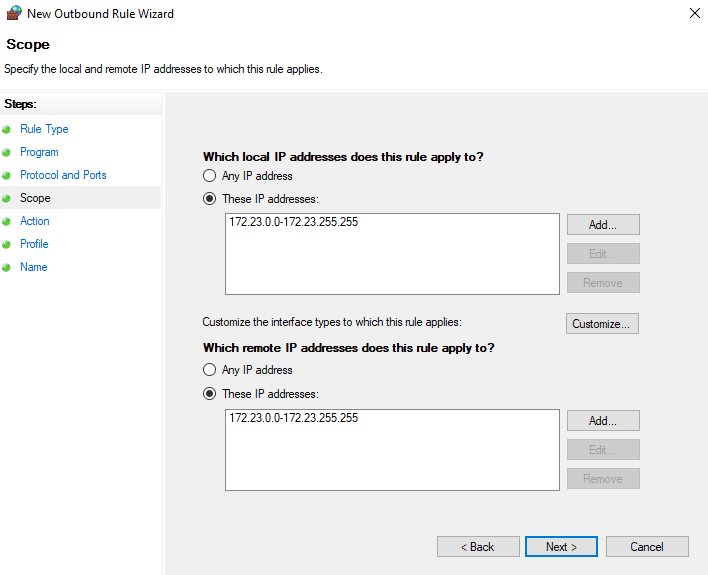
- Click Inbound Rules, and click New Rule... on the right hand side.
- In the next window that pops up, follow the following instructions, using the steps column on the left:
- Set Rule Type to Custom.
- Click Scope, then tick the two options for These IP addresses.
- Click Add next to both boxes, and then This IP address range, and enter 172.23.0.0 in the top box, and 172.23.255.255 in the bottom box. See example image below of the finished result.
- Click Action and make sure allow the connection is ticked.
- Click Name and choose any name for this rule.
- Repeat the above instructions for an Outbound Rule.
Example of IP range setup:
| hide |
|---|
|
|
| Beginner guides |
|
| Intermediate guides |
|
| Advanced guides |
|